Monday, November 11, 2013

Ratatouille

Ratatouille

I am always looking for new side dishes to enjoy with our regular pork chops or chicken nights. I was at a friend's house for dinner and she served Ratatouille. "Like the one from the movie?" I asked her. Yep, that's the one! She looked up a recipe online after seeing the movie and found it to be a family favorite. I was shocked when I made it later that week and my husband loved it! It is now a regular rotation in our house.

Ingredients:

1 (6 oz) can of tomato paste
1 medium onion, sliced
1/4 c minced garlic
1-2 TBS olive oil
2 med eggplants, thinly sliced
2 med zucchinis, thinly sliced
1 med bell pepper or 4 small sweet peppers, cored, seeded, & thinly sliced
1 tsp Italian seasoning
Salt & Pepper to taste
2 TBS Parmesan Cheese (optional)
1/2 c Mozzarella Cheese (optional)

Sommer's Secret: There are lots of ways to make this dish. You can:
- Dice up all the veggies in big chunks and throw them in the pan to bake.
- Slice and Layer the ingredients (like I'm doing in this recipe)

- Add any other veggies you might have (I added fresh Spinach this time)
or
- Get really fancy like my husband and make it look like it did in the movie. Like this:

(he used a mandolin to get all the slices perfect and layered the ingredients in the saute pan he started the sauce in).

Either way it turns out really yummy.

1. Slice the eggplant, zucchini, peppers and onions into roughly 1/4 inch slices.

Sommer's Secret: Do less at first. You can always slice more veggies if you need. You'll be surprised at how a little goes a long way.

2.  In a sauce pan, soften garlic ( and 1/4 chopped onion if you'd like) in 1 tablespoon olive oil. a

3. Add tomato paste and seasonings (mixture will be thick)

Sommer's Secret: If you use an oven proof saute pan you can begin layering in your veggies in the same pan and bake.

4. Spread the mixture on the bottom of  a roasting pan.


Sommer's Secret: I wanted to make a big lasagna size for dinner so I only spread a little of the sauce in the bottom of the pan reserved the rest to be distributed in the layers of veggies.

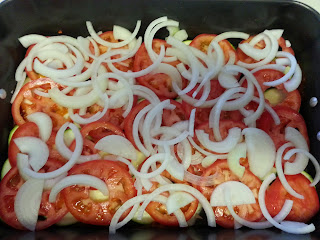
5. Layer your sliced vegetables seasoning to taste as you go along.


I added some sauce here,


and a little cheese so there would be a some in the middle.


I threw in some Fresh Spinach I had


and finally piled in the rest of the cut veggies


6. Sprinkle Salt and Pepper and drizzle with a little olive oil (optional).


7. Cover with foil or parchment paper.


8. Bake at 400° for 45- 60 minutes until veggies are fork tender.


9. Add shredded cheeses to the top


10. Broil until  brown and bubbly.


Sommer's Secret:  Ratatouille isn't traditionally served with cheese but I just couldn't resist. It's super yummy either way and is a great alternative to a heavy starch for dinner.

This night we served it with baked chicken. It's super yummy with pork chops too!


Sommer's Secret:  Ratatouille is even better then next day. Store it in a container with an elevated bottom to allow the extra juices from all the veggies to drain. Even if you don't it's still just as delicious even if it's a little soggy.


This is how my hubby's turned out. (Served with out cheese)


Sunday, September 8, 2013

Sommer's Secret Way to Cut a Watermelon


I LOVE Watermelon. It's a fact. Watermelon = Summer time.  I get a little giddy when I think of eating the yummy juicy COLD fruit. Actually did you know it's actually a vegetable closely related to the tomato?!  If you think about it, it makes sense it kinda looks like a green tomato and they have similar seeds inside.

Fruit or Vegetable I love Watermelon.

I remember feeling like a  "big kid" when you could eat watermelon like our dad did, in one big round slice. On a plate. With a fork. (mental note: ask dad why he ate it that way...cuz I have NO idea where he learned to eat it that way).

Some people eat watermelon with a shaker of salt (weird). Most eat it in slices (normal). Thanks to pinterest I've learned tons of other ways to prepare it... balled in a cut out baby basinette, cut up like a jack-o-lantern, on skewers, or grilled drizzled with honey (fancy). My korean dramas have taught me to eat it in thin slices with a tiny fork. I've even since learned that some people eat pickled watermelon rind and a friend of mine cooks the rind in a soup!

This all got me to thinking what would be an easier way to cut slice a watermelon? I realized that I've never really been "formally" taught how to cut a watermelon. My Navajo Grandpa John would eat all his melons under the shady pine trees at his Crystal, NM home.

He would cut random slices off with an old pearing knife and eat the fruit at room temperature. This was always such a refreshing treat on hot Summer days.

Mostly I remember eating it chilled.  Sliced up and then cut into wedges. Not the full half wedge like on cartoons or stickers but more like the 1/4 slice wedges.

Anyway, I like my watermelon super COLD, seeded or seedless, peeled and cut up into chunks. I have "invented" a "new" way to cut up a watermelon to my personal specifications (at least I like ot think I invented it). Here's my secret to cutting a watermelon.

Disclaimer: I'm sure someone else discovered it and I haven't thought to really look it up on internet, but here is how I slice it.

1. Prepare your workspace.Use a big clean cutting board and sharp knife.

Sommer's Secret: I like to get a grocery bag ready for the rinds to go into for quick clean up. I set it right next to my cutting surface all ready to go.


2. Wash your watermelon (there's no need to dry it, unless you feel like it ). I really didn't start washing my watermelons until more recently.

 Honestly, I had never heard of it before. Admittedly I've become more of a germ-a-phobe in my recent years but really you have no idea what's been on the outside of your melon. In this case, my tiny Thai watermelon was given to me by my father-in-law and it took an unfortunate spill during transport from the car to my apartment so it actually has a small split in the side (you can see the split in the later pictures).

Sommer's Secret: use a cutting board with a small groove all around the edge to keep juices somewhat contained. However, if you have a juicy fruit there isn't much you can do except for a well placed towel to catch drips.

3. Lay your melon on it's side and slice off one end. (can you see the split?)


 4. Position your melon cut side down. This first cut keeps your melon stable.

Sommer's Secret: There's really no need to remove the label since you are gonna cut it off anyway.

5.  Place cut scraps into your "trash" bag as you go.

Note: This picture looks like I'm wasting a bunch of melon. I assure you I'm not as it was a super slim cut. I ended up spooning out the fruit and eating it, after all the Thai watermelons are mere "snacks" and there must be a treat for my hard work right?


 6. " Peel" the watermelon by making small slices all around the melon.


Sommer's Secret: Make short slices to save on waste. You can always go back and clean up any rind left on the fruit at the end. 


Once the rind has been sliced off all the way around you can lay it on it's side and slice off the rind from the top and bottom edges.

 Clean as you go....

7. Cut the peeled fruit in half.


8. Place each half cut side down.


9. Slice or cube to your heart's content.


Hmmmm...My peeled and sliced watermelon looks mysteriously  similar to the melons you see on those fancy fruit trays at buffets....


8. After the melon has been cut into the desired shape, De-seed each piece by running the blade of your knife against the embedded seed as you pick up each piece to put into your serving dish.  


Sommer's Secret: Using the edge of you knife blade to scrape off the seeds will result in a little fruit loss. In my case this melon was a little ripe in the middle (or possibly bruised by the fall it took) so it was no biggie for me.


 9. Clean up you sticky mess by sliding the discarded parts into you little trash bag.

Tie and toss. 

10. Enjoy!
Hoku's first taste of watermelon and first time using her Bumbo table top.
You haven't really "lived" until you've had watermelon juice dripping all over you.

Sunday, August 25, 2013

Sommer's Easy Mexican Rice

This is a super fast easy side dish for Taco Tuesdays or Sommer's Enchiladas!

Ingredients:
1 c uncooked rice
2 c water  with 2 tsp Better Than Bouillon or  2 c Chicken Broth
1 TBS Olive oil
1/2 c salsa
1 tsp minced garlic
1 tsp taco seasoning
1 tsp cilantro
1 tsp ground cumin
1/4 c frozen or fresh corn (optional)

Sommer's Secret: read my blog post on seasonings.

1. Bring all ingredients to a boil on medium high heat.

2. Reduce heat to low and cover. Leave alone for at least 20 minutes NO PEAKING!

Sommer's Secret:Throw everything in a rice cooker and push the button!


3.  After 20 minutes or when rice cooker is done uncover and fluff with a fork.


Serve hot with other yummy Mexican food!