Monday, November 24, 2014

Sommer's Navajo Blue Corn Cake with Honey Butter

Navajo cuisine is straightforward; beans, squash, corn, potatoes, meat and simple unleavened bread all garnished with salt, pepper, and onions. The real flavor is the outdoor method of cooking and in the variety of chili peppers used (sometimes being eaten raw along side a dish).

I was at a loss recently when trying to find something to being to a Relief Society "Share your Heritage" night and asked pretty much everyone I knew for a recipe. We all had the same ideas, frybread, stew, blue corn mush....

But I wanted something that would be more 'palatable' for those who weren't used to bland Navajo food and I didn't want to take the time to make frybread unless I could do it 'real' justice...meaning fresh fried on site. Cold frybread is no way to introduce someone to what the real thing is.

Anyway I came up with my own recipe that is light and fluffy,  not too bland, and not too sweet...just perfect in my book. I call it Navajo Blue Corn Cake which can be made in muffin form or in a cake pan.

Yield: 12 squares

Ingredients
1 1/2 cups all purpose flour
1/2 cup Blue Corn Meal
1 1/2 tsp Baking Powder
1/2 cup (1stick) Melted butter
1 cups Granulated Sugar
1 cups Milk
3 eggs
1 tsp juniper ash (optional)

Sommer's Secret: Juniper ash (usually used in Navajo blue corn recipes)would greatly complement this recipe but I didn't have any.

Sommer's Secret:  You can use regular corn meal but then is no longer blue corn bread :o)....I guess there's always blue food coloring (I won't judge) but the taste won't be the same....but still yummy!
I used  my 'Navajo Maize' Blue Corn Meal

Directions

1. Melt butter.

Sommer's Secret: I keep most of my butter in the freezer and always forget to set it out in time to reach room temperature. And I somehow manage to forget how to change the temperature on the microwave ie: 30% or low etc. Microwaving at regular temperature or high just splatters it all over. So instead I use the "time defrost" setting for 2-3 minutes to soften and melt my butter (less time to just soften the butter).

2. Combine all ingredients in a bowl. 

3. Mix until well incorporated (there may be a few lumps).

4. Pour into a greased or sprayed 9X13” pan. Or papered muffin tins.

Sommer's Secret: I use a "trigger" ice cream scoop to get uniform muffins and doubled the recipe for 3 dozen muffins with a little left over for a tiny loaf.

5. Bake at 350° for 20-30 minutes until the edges are golden brown and the center springs back when you touch it lightly.

Sommer's Secret: I find it more most when you under cook it slightly where the center springs back but "dents in" just a little to the touch. 

6. Serve warm with butter.

Sommer's Secret: Some Honey Butter would bring these muffins over the top but it's plenty sweet on it's own.

Sommer's "2 Ingredient" Honey Butter

1 stick butter or margarine
3 TBS to 1/4 cup Honey

1. Soften butter or margarine to room temperature or in microwave.

2. Mix in honey to taste until smooth and creamy.

Sunday, November 9, 2014

Dinner in a Pumpkin

I LOVE FALL TIME. I miss the changing of the leaves and the crisp Autumn air. This time of year is when I get the most homesick. Cooking and baking help me fill the void of the changing seasons. Here's my take on the good 'ole Dinner In A Pumpkin.

Ingredients:
1 Medium to small size Pumpkin
2-4 Cups Cooked Rice
2 TBS Olive Oil (or oil of your choice)
1 bag Frozen mixed Veggies
2 cans Cream of Mushroom Soup
1 packet Lipton Onion Soup Mix
1 Medium Onion (Chopped)
1 pound ground meat (Beef, Pork, Chicken, or Turkey)
Salt and Pepper
2-4 cups water or Chicken Broth (optional)

Sommer's Secrets:
Pretty much all varieties of pumpkins are edible, including their seeds. The type and size of pumpkin affect their taste and texture.

Pie or Sugar Pumpkins are better for baking and cooking. They're sweeter and have a smoother texture.

"Jack O' Lantern" Pumpkins are larger and better for carving but can be just as yummy in your recipes. Small or Medium Sized pumpkins work best. 

Larger to Giant pumpkins are just as edible but their texture can become more stringy and coarse the larger they are with less"pumpkin" flavor.

Tiny pumpkins can be eaten but have little flesh so most people use them as bowls or accent pieces.

Directions:

1. Get your rice cooking how ever you like to make your rice.

Or even better use leftover cooked rice

Sommer's Secret: I pretty much use only Calrose Rice cooked in my rice cooker. I definitely don't eat the boxed minute stuff anymore that was once the only "rice" I ate except for when eating Chinese food. It'd be fun to try different rice varieties to see how it affects the taste and texture of this dish.

To add more flavor I will substitute Chicken or Beef Broth for water or cheat with some some a few scoops of bouillon. paste added to the rice and water and press cook. 


I like "Better than Bouillon"  that I get at our local Sam's Club. It's pretty much a concentrated broth paste. I like the lower sodium one to limit salt. It's lots cheaper than buying chicken broth by the can, lasts a long time in the fridge and is easy to add to pretty much anything for extra flavor like my Easy Mexican Rice.

2.Cut the stem part off of your pumpkin.Leaving enough pumpkin to create a lid (like when making a jack-o-lantern).


3. Scrape out all of the  slippery insides and seeds. Discard or Keep the seed,it's up to you.(I still need to find a good way to roast pumpkin seeds, I always seem to burn them including the poor ones pictured below).


4. Rub oil all through the inside of the cleaned pumpkin. Generously Salt and Pepper. Set aside.


5.Brown ground meat and onions in skillet. Season to Taste.


6. Stir in frozen Vegetables


7. In a large mixing bowl. Combine Cream of Mushroom Soup and Lipton Onion Soup Mix.


8. Add meat mixture 


9. Add rice

Sommer's Secret: Since I'm using such a giant pumpkin I also used my left over rice.

10. Mix well.

11. Place mixture in prepared pumpkin.

Sommer's Secret: Don't pack down the mixture. Some Crispy Onion strips, breadcrumbs or toasted pumpkin seeds on top of the mixture would add a nice crunch.

12. Place pumpkin "lid" back on.


13. Put on a baking sheet and insert into a 350 degree Preheated oven.


Sommer's Secret: Use a baking sheet with a lip/edge and cover with aluminum foil to catch juices. I suggest using a baking rack and pierce the outside of the pumpkin to assist with juice draining. See end result.

14. Bake for 45 to 60 minutes until pumpkin flesh can be easily speared with a fork.


Sommer's Secret: My oven was super small and my pumpkin was super big so it took a little longer to bake and the outside looked burnt. But the pumpkin meat was cooked perfectly.


Serve warm.

Sommer's Secret: I was a littler over zealous and made enough to feed probably 15 people, and forgot to take a nicer picture, but this was DELICIOUS. I couldn't wait to try it and noticed more juices accumulated as I let it sit so finally placed it on a rack.

Because I used a larger pumpkin the flesh was a little bland and watery but a good compliment to the rich filling. I would definitely make this again with a smaller pumpkin and would add more seasoning to the cored pumpkin before filling. I'd also cook it on a baking rack and pierce the outside of the pumpkin to assist with juice draining.

This made great left overs - for days in my case ;o)

Monday, February 3, 2014

No Box Mix Fudge Brownies

Sundays are my baking days. I love to try out new recipes and I've kinda gotten into the bad habit of always having something sweet to eat on Sunday afternoons, it's probably my guiltiest pleasure. My college roommates introduced me to box brownies and I have never been the same again. But recently, I was all ready to have my  ice cream (a pantry necessity) with some warm brownies fresh from the oven.....of course that was the day there was no mix to be found. Luckily I found a recipe online, tweaked it a little and now I can have homemade brownies just as fudgey as the box kind! In almost the same amount of time!

Preheat oven to 350 Degrees

Ingredients:
1 stick (1/2 cup) butter or 1/4 cup Vegetable Oil
2 cups Sugar
1 cup Cocoa Powder
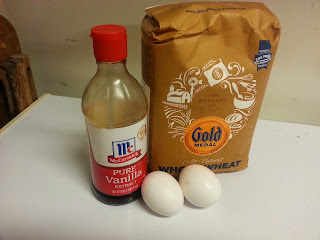
1 teaspoon Vanilla
2 eggs (cold)
1 cup flour
1/4 teaspoon salt

Yield: 9 large brownies

Sommer's Secret: 1/4 cup Vegetable Oil can be substituted for the butter and the recipe comes out just as yummy.


Sommer's Secret: I use a mix of Dark Cocoa powder and regular cocoa powder. The dark chocolate adds a depth of richness and dark coloring to the brownies but can be a little overpowering.
I dilute it with regular cocoa powder I get from my mega can from Sam's Club/CostCo. Since the dark is a little pricier (at least in Hawaii) than regular so it helps me get the flavor without using a whole lot.


1. Combine the butter, sugar, cocoa powder(s), and salt into a medium size microwave safe bowl.


2. Microwave on high for 2 minutes. 


3. After taking the mixture out of the microwave, add in your vanilla (it may sizzle just a little)


4. Stir to until well combined.


(Your mixture will be kind of 'gritty' looking)

5. Stir in flour and eggs. The mixture will be thick.

Sommer's Secret: for more 'cake like' brownies increase eggs to 3.

Sommer's Secret: Usually I'm able to add the flour and eggs all at once. If your mixture seems to be a little too hot, incorporate a little of the flour first so you don't 'scramble' the eggs. Test the temperature with your finger. It should be feel like really warm bath water. If it's still too warm, add a little more of your flour before adding the eggs.


6. Spread (more like pat out) the mixture evenly into an 8X8 greased baking dish.


7. Bake for 20-30 minutes.

Sommer's Secret: I preheat my oven to 350 degrees then turn it down to 325 just before putting in the brownies. A cooler baking temperature keeps my brownies from getting too dry on the top. Insert a toothpick into the center to test for 'doneness'. I take my brownies out when a little wet mixture still clings to the toothpick, but you can bake for a little longer until your toothpick comes out pretty clear. 

8. Cut into squares. Of course you can make them smaller....but why would you? ;o)

Sommer's Secret: The old "use a plastic knife to cut your warm brownies" has always worked for me to get clean cut lines.


9. Serve warm with ice cream!!!


Monday, November 11, 2013

Ratatouille

Ratatouille

I am always looking for new side dishes to enjoy with our regular pork chops or chicken nights. I was at a friend's house for dinner and she served Ratatouille. "Like the one from the movie?" I asked her. Yep, that's the one! She looked up a recipe online after seeing the movie and found it to be a family favorite. I was shocked when I made it later that week and my husband loved it! It is now a regular rotation in our house.

Ingredients:

1 (6 oz) can of tomato paste
1 medium onion, sliced
1/4 c minced garlic
1-2 TBS olive oil
2 med eggplants, thinly sliced
2 med zucchinis, thinly sliced
1 med bell pepper or 4 small sweet peppers, cored, seeded, & thinly sliced
1 tsp Italian seasoning
Salt & Pepper to taste
2 TBS Parmesan Cheese (optional)
1/2 c Mozzarella Cheese (optional)

Sommer's Secret: There are lots of ways to make this dish. You can:
- Dice up all the veggies in big chunks and throw them in the pan to bake.
- Slice and Layer the ingredients (like I'm doing in this recipe)

- Add any other veggies you might have (I added fresh Spinach this time)
or
- Get really fancy like my husband and make it look like it did in the movie. Like this:

(he used a mandolin to get all the slices perfect and layered the ingredients in the saute pan he started the sauce in).

Either way it turns out really yummy.

1. Slice the eggplant, zucchini, peppers and onions into roughly 1/4 inch slices.

Sommer's Secret: Do less at first. You can always slice more veggies if you need. You'll be surprised at how a little goes a long way.

2.  In a sauce pan, soften garlic ( and 1/4 chopped onion if you'd like) in 1 tablespoon olive oil. a

3. Add tomato paste and seasonings (mixture will be thick)

Sommer's Secret: If you use an oven proof saute pan you can begin layering in your veggies in the same pan and bake.

4. Spread the mixture on the bottom of  a roasting pan.


Sommer's Secret: I wanted to make a big lasagna size for dinner so I only spread a little of the sauce in the bottom of the pan reserved the rest to be distributed in the layers of veggies.

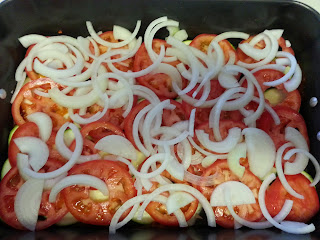
5. Layer your sliced vegetables seasoning to taste as you go along.


I added some sauce here,


and a little cheese so there would be a some in the middle.


I threw in some Fresh Spinach I had


and finally piled in the rest of the cut veggies


6. Sprinkle Salt and Pepper and drizzle with a little olive oil (optional).


7. Cover with foil or parchment paper.


8. Bake at 400° for 45- 60 minutes until veggies are fork tender.


9. Add shredded cheeses to the top


10. Broil until  brown and bubbly.


Sommer's Secret:  Ratatouille isn't traditionally served with cheese but I just couldn't resist. It's super yummy either way and is a great alternative to a heavy starch for dinner.

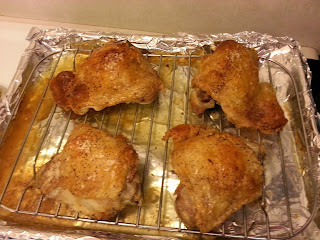
This night we served it with baked chicken. It's super yummy with pork chops too!


Sommer's Secret:  Ratatouille is even better then next day. Store it in a container with an elevated bottom to allow the extra juices from all the veggies to drain. Even if you don't it's still just as delicious even if it's a little soggy.


This is how my hubby's turned out. (Served with out cheese)